Copyright 2005-2025 Cabinet Planner LLC
A special note about 3D on Vista machines:
If you are running Windows Vista Home Premium, Business or Ultimate and have Aero windows
enabled you may not be able to print the 3d models. There is a checkbox in the General Standards
window to have the program disable Aero while the 3d model is being viewed.
To turn off Aero, follow the steps below.
1.Click Start, and then click Control Panel.
2.Click Appearance and Personalization.
3.Under Personalization, click Change the color scheme.
4.In the Appearance Settings dialog, click Windows Vista Basic, and then click OK.
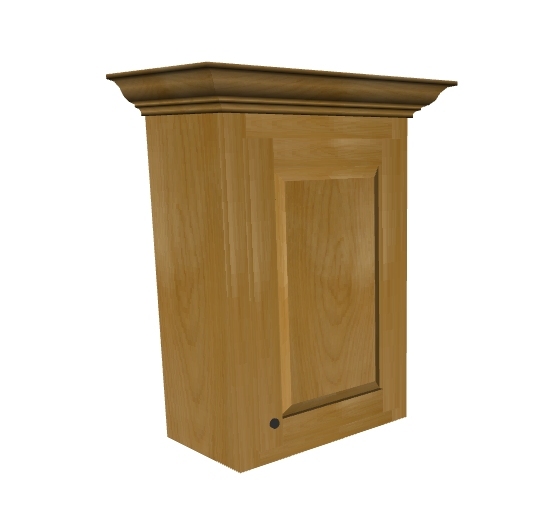
Any job that has cabinets placed on walls can be viewed in 3d with the program. You can select from various images of wood grain to apply to the cabinets and several different images to apply to countertops. There is also a separate download to add more images to choose from.
Under the File menu there is a selection called ‘Select 3d images’. This will open a window where you can pick which images to apply to the current job or to set as your default for the cabinets and countertops. When you select an image from the list and press either of the buttons, text below the buttons will confirm your selection.
With a job open press the ‘3d’ button on the toolbar and the program will begin creating the 3d model. The amount of time it takes to generate the model will depend on your systems speed and the size of the job. Most average kitchens should take only about 5-10 seconds.
There are 14 buttons and two listboxes in the 3d window:
• Zoom in- enlarges the current view.
• Zoom out- shrinks the current view.
• Move Camera buttons-moves the camera up, down left or right.
• Aim Camera-points the camera up, down, left or right.
• << Rotate-rotates the model to the left.
• Rotate>>-rotates the model to the right.
• Remove wall listbox-selecting a wall in this box will remove it and all of the cabinets on it from the model. This is very handy when a wall is blocking the scene.
• Add wall-adds any removed walls back to the model.
• Print-Prints the current view.
• Reset view-resets the model to the original angle, zoom factor and re-adds any removed walls.
There is a download on the Upgrade page which will add more images to choose from. These are keep separate to keep the download size of the main program from being too large.
If you would like to add your own images they need to be 24 bit bitmaps, resized to 256x256 and with the grain going up & down. Simply place the image in the ‘3d textures’ folder which can be found in the Cabinet Planner folder in your Program files. In doing this you may notice that the appliance images all begin with ‘xxx ‘. This is to keep them from showing along with the standard images.
If you have any images which you think should be added to the separate download please forward then to me.
Under the Settings menu there is a selection name "3D settings. This will let you set the multisampling rate if you have an accelerated graphics card. You can choose from 0, 2, 4, 8 or 16 sampling rates. If setting this does not show any effect on your 3d renderings then you probably do not have a card capable of multisampling. I hope to compile a list of available cards that this will
work with. As you can see in the photos there isn't much of a gain once you go above 4x. (click for larger view)
If you are running Windows Vista Home Premium, Business or Ultimate and have Aero windows
enabled you may not be able to print the 3d models. There is a checkbox in the General Standards
window to have the program disable Aero while the 3d model is being viewed.
To turn off Aero, follow the steps below.
1.Click Start, and then click Control Panel.
2.Click Appearance and Personalization.
3.Under Personalization, click Change the color scheme.
4.In the Appearance Settings dialog, click Windows Vista Basic, and then click OK.
Viewing 3d models
Any job that has cabinets placed on walls can be viewed in 3d with the program. You can select from various images of wood grain to apply to the cabinets and several different images to apply to countertops. There is also a separate download to add more images to choose from.
Selecting images:
Under the File menu there is a selection called ‘Select 3d images’. This will open a window where you can pick which images to apply to the current job or to set as your default for the cabinets and countertops. When you select an image from the list and press either of the buttons, text below the buttons will confirm your selection.
Viewing the model:
With a job open press the ‘3d’ button on the toolbar and the program will begin creating the 3d model. The amount of time it takes to generate the model will depend on your systems speed and the size of the job. Most average kitchens should take only about 5-10 seconds.
There are 14 buttons and two listboxes in the 3d window:
• Zoom in- enlarges the current view.
• Zoom out- shrinks the current view.
• Move Camera buttons-moves the camera up, down left or right.
• Aim Camera-points the camera up, down, left or right.
• << Rotate-rotates the model to the left.
• Rotate>>-rotates the model to the right.
• Remove wall listbox-selecting a wall in this box will remove it and all of the cabinets on it from the model. This is very handy when a wall is blocking the scene.
• Add wall-adds any removed walls back to the model.
• Print-Prints the current view.
• Reset view-resets the model to the original angle, zoom factor and re-adds any removed walls.
Adding additional images:
There is a download on the Upgrade page which will add more images to choose from. These are keep separate to keep the download size of the main program from being too large.
Adding your own images:
If you would like to add your own images they need to be 24 bit bitmaps, resized to 256x256 and with the grain going up & down. Simply place the image in the ‘3d textures’ folder which can be found in the Cabinet Planner folder in your Program files. In doing this you may notice that the appliance images all begin with ‘xxx ‘. This is to keep them from showing along with the standard images.
If you have any images which you think should be added to the separate download please forward then to me.
Under the Settings menu there is a selection name "3D settings. This will let you set the multisampling rate if you have an accelerated graphics card. You can choose from 0, 2, 4, 8 or 16 sampling rates. If setting this does not show any effect on your 3d renderings then you probably do not have a card capable of multisampling. I hope to compile a list of available cards that this will
work with. As you can see in the photos there isn't much of a gain once you go above 4x. (click for larger view)


Rendering with no multisampling
2x multisampling
4x multisampling
8x multisampling
16x multisampling