Copyright 2005-2025 Cabinet Planner LLC
All cabinets:
The width, height, depth and all stile & rails can be edited for each cabinet. If there is a box for a partition, you can just leave it blank if you do not want a partition.Scribe left and scribe right is the amount that you want the face frame to overhang on that side of the cabinet. If you leave these fields blank, you will see an 'F' ( for finished ) on the corresponding bottom corner of the drawing. Entering a value in these fields will adjust the cabinet box sizes so that the face frame overhangs. The program will then place a 'U' ( for unfinished ) on the corresponding bottom corner of the drawing and below that the amount to overhang the face frame will be printed.
Each opening with doors can be set to have 1 or 2 doors. The overall door size is figured by adding twice the door overlay to the opening width and height. If the opening is set for two doors, the door width is figured as 1/2 the opening width minus 1/2 the Door Gap for paired doors plus the door overlay.
Location is the dimension from the left edge of the wall to the left side of the cabinet.
Off floor is the dimension from the floor to the bottom of the cabinet.
From wall is the amount to place the cabinet away from the wall.
Wall # is the wall that a cabinet is to be placed on.
The crown left, front and right lets you decide if you want crown to be drawn that side of the cabinet on the elevation views.
Crown overlay is the amount that the crown overlays the top of the cabinet. The crown height is the height of the crown. A typical 3 1/4 inch crown moulding is about 2 1/4 high when installed.

Upper 1,2,3&4 openings:
All settings for these cabinets are the same as above except that if you are planning a 1 opening cabinet the boxes for middle stile and partition are disabled.
Upper Open Below:
If you want 2 upper opening, enter a value in the middle stile box. The lower opening will still be just 1 opening.
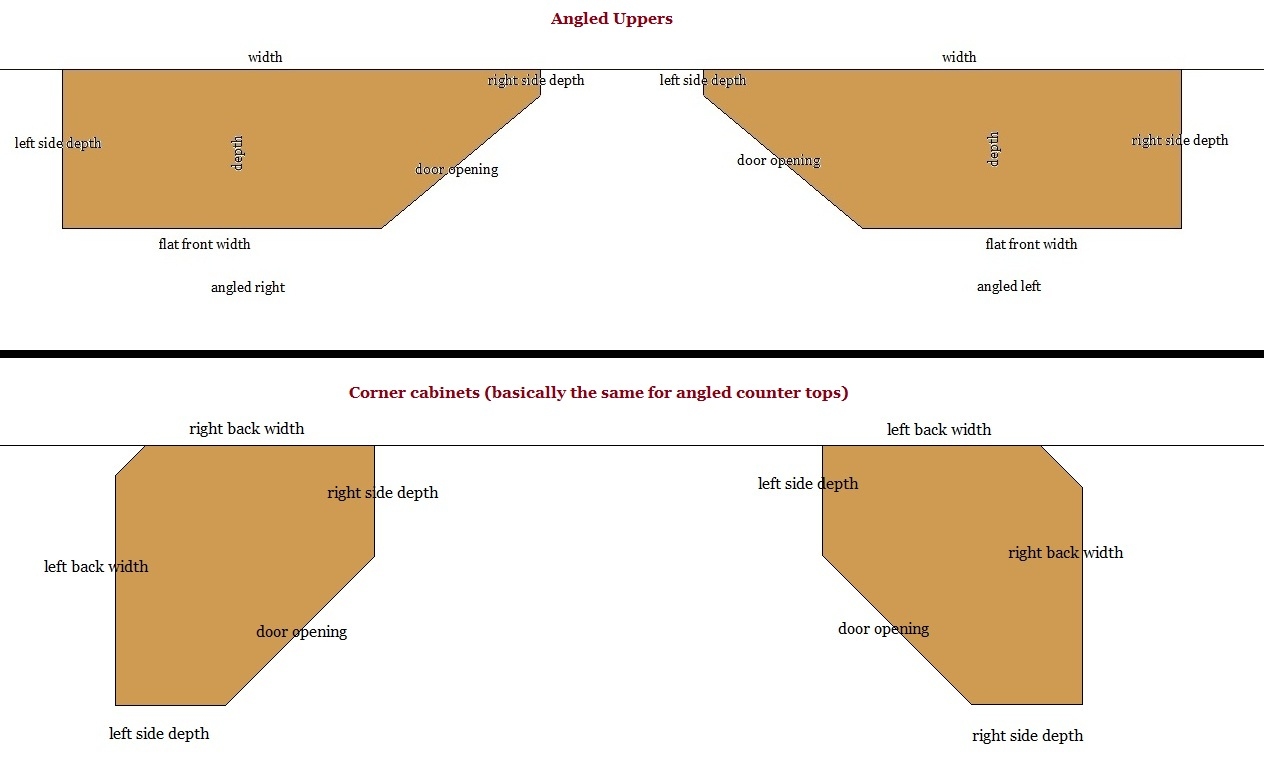
Upper Corner Cabinet:
Left and right back widths are the overall widths of the back of the cabinet. Left and right side depths are the depths of the individual sides. Angled left or right is the orientation that the cabinet is drawn in the floor plan and elevation views. Click here for some drawings showing the way upper cabinets are planned.
Angled Upper:
Left and right side depths are the overall depths of each side. Angled right or left is the side that the angled face is on. Flat front width is width of the front of the cabinet. With this and the other angled cabinets it is best to do a little experimenting with the sizes to see how they work.
Upper Blind Cabinets:
Entering a size in the middle stile box will give you a cabinet with 2 openings. The blind end width is automatically set to the depth of the upper cabinets. If you choose a left blind cabinet, the left scribe box will
be disabled. Same for right blind cabinets.
Fridge with legs:
A middle stile is automatically given, but you can set its size to 0 to have only 1 opening. Left and right legs
should be self explanatory.
Base Cabinet:
Can be set to have 0, 1 or 2 drawers per door opening. Entering a size for the middle stile will give you a cabinet with 2 door openings. Adjusting the size of the drawer opening will change the height of the door opening.
2, 3 & 4 Drawer Bases:
The sizes you enter for the upper drawer openings will determine what is left over for the bottom drawer.
2+2 Drawer Base:
Creates a base cabinet with two long drawer on the bottom and two shorter drawers above.
Sink Base:
Entering 'Y' in the box for inset will plan the cabinet with an inset face frame. This is a nice feature for kitchen sinks. The face frame will be set in 2 inches regardless of the face frame thickness. Selecting 2 drawer fronts will automatically give you a middle stile.
Tray Cabinet:
A tray cabinet is a base cabinet with no drawer and a tray divider made of the same material as your drawer boxes.
Blind Bases:
Blind bases are basically treated the same as blind uppers. Entering a size for the middle stile will give a cabinet with 2 openings. If you do not want a drawer, just enter 0 for the drawer opening height and 0 for the middle stile.
Angled Corner base:
Creates a corner base cabinet with two finished sides and an angled face. Back corner has a 4 inch clip. Can be planned with or without a drawer. To add a drawer just enter the middle rail width and the height of the drawer opening. The depth of drawer box must also be entered.
Angled Base:
These are basically the same as the angled uppers.
Lazy Susan Base:
Creates a cabinet for use with a lazy susan, though a shelf can be installed instead. Plans the face frames to be mitered where they meet in the middle. There are two setting on the Set Standards window for adjusting the widths of each door. Since there are many way to attach doors to a Lazy Susan cabinet, you will need to experiment with these setting to get the door sizes right for you.
Tall 1,2 & 3 Opening:
The upper opening sizes will determine what is left over for the lower opening. The top and middle opening boxes will be disabled according to which cabinet you are planning. Entering a size for the middle stile will plan a cabinet with 2 openings.
Tall 1,2 & 3 Opening Corner:
These are basically the same as the upper corner and tall cabinets. Entering a size for the middle stile will plan a cabinet with 2 vertical openings.
Tall Wall Oven Cabinet:
Entering a size for the middle stile will plan the cabinet with 2 upper openings. The upper opening and oven opening will determine what is left for the drawer opening.
Offset Vanities:
Drawer left or right will place the drawers on the side chosen.
Vanity Drawers L & R:
Plans a cabinet with two sets of drawers, one on each side.
Vanity Drawers left, Drawers Right:
Plans a cabinet with drawer on the chosen side and doors on the other side. The side door opening can
have either 1 or 2 doors.
Vanity Door On Sides:
Plans a cabinet with doors on both sides of the sink opening.
Double Bowl Vanity:
Plans a cabinet with 2 sink openings and a set of drawer between.
Vanity Two Drawer Two Doors:
Creates a vanity with one bottom opening and a drawer on both sides of the false sink front.
Pencil Drawer:
Plans a pencil drawer unit with 1 or 2 drawers, depending on the middle stile. If you set the bottom rail size to 0 the drawer front will be adjusted so it stays flush with the bottom of the unit.
Valance:
Plans a valance which can be cut to any pattern you wish. Can also be used to apply crown anywhere on an elevation view. The box for width of arch is for if you need to have a flat area before the arch begins. The rise of arch is from the bottom of the valance to the high point of the arch. Entering zero in these boxes will plan a square valance.
Shelf:
Plans a shelf with a choice of finished sides.
Counter top:
Gives you a counter top for elevation views only.
Window, Door, Stove, Dishwasher, Fridge, Microwave and sink:
These are used only for 3d, floor plan and elevation views.
Individual doors:
Allows you to plan just doors without a cabinet. You can choose from any of the 16 available door types.
Raised Panels:
Plans a raised panel back or wainscoting, depending on what you do with it. Can be any length and have any amount of panels. The amount of panels must be greater than 0 or you will receive a division by 0 error.

The drawings below are for a reference of how the program designs the cabinets. They were not produced with the rogram.
